Modifying the Vocabulary
pVoice ships without any contents or symbols. You will have set up your own vocabulary. You can do this by going into Edit mode. This is achieved by selecting 'Edit this page' from the 'Edit' menu.
Editing pages
When you've started pVoice for the first time, you're stuck with an empty Themes page where you can do nothing yet. To start adding data to the vocabulary, you will have to start adding data to the Themes page. This is the page the user will start with every time pVoice is started.
You can add Themes to this page, but it's also possible to add 'normal' items to this page. To start editing, select 'Edit this page' from the 'Edit' menu.
When you've selected 'Edit this page', you've entered the Editmode. The screen now contains clickable buttons. To start editing an item, just click on one of the empty buttons (except the navigationbuttons that are already there). When an empty button is clicked, you're confronted with the 'edit' window:
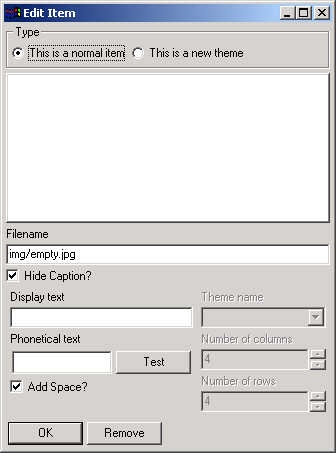
By default, pVoice expects that this new item is 'a normal item', which means it will represent a word or a phrase. Since we're editing the Themes page, we'll start by explaining how to add a theme.
However, you can add themes and normal items on any page in pVoice. This explanation applies not only to adding a theme on the themes page, but also to adding themes within other pages.
Adding a theme
First of all, we start by choosing 'This is a new theme', which disables the entryfields that only are appliccable to normal items, and enables entryfields all entryfields appliccable to themes.
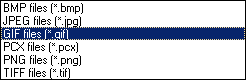 The large white area you see, is actually a button. To select a symbol representing the theme you are creating, you have to click that large white button. This will cause a fileselection dialog to pop up. You can select a few different fileformats which pVoice supports from the 'Files of type' dropdown box as you can see here. The supported image fileformats are TIFF, BMP, GIF, JPEG, PCX and PNG.
After selecting a file and clicking 'Open', this image is loaded in the large button you clicked earlier.
You can now select wether or not you want a caption to be shown. If you selected 'Never show text under symbols' in the Preferences, you will never see a caption for a symbol. However, if you selected 'Show text under symbols (unless disabled)' from the preferences, pVoice will show a caption for a symbol, unless you select 'Hide Caption?' here. If you uncheck this, pVoice will show the name of the theme under the symbol for this theme.
The next thing to do is choosing a name for the theme. If this theme is a new theme, you can just type in a new name. If you want this theme to be a reference to an existing theme, you can select one of the existing themes from the dropdown box. Keep in mind that if you select an existing theme, this created theme is only a reference to an existing one, it won't create a copy of it. Any changes you make in this theme, will appear in every occurrence of this theme. Removed themes will also still appear in this list, which makes it easier to 'move' themes from one place to another (see 'Removing an existing item or theme' below)
Finally you have to define the symbolmatrix, by telling pVoice how many rows and how many columns of symbols this new theme will have. By default, pVoice suggests a matrix of 4x4 symbols. However, you can change this to any number of columns and rows you want. For example, when you want to create a theme with individual letters, you probably want more rows and columns than when you create a theme that contains your pets.
After clicking 'OK' the theme is added and will be shown in the pVoice themes page.
One thing that probably isn't very intuitive (and will be changed in the next version) is how you can continue editing inside the theme you've just added. To edit the contents of a theme, you must first leave the Edit mode you're in, by again selecting the 'Edit this page' item from the 'Edit' menu. This will cause pVoice to save the data and reload it. Then you can go into the theme you just created (see Navigating in pVoice) and again go into Edit mode by selecting 'Edit this page' from the 'Edit' menu.
Adding a normal item
To add a normal item in pVoice, you first have to navigate to the page where you want to
add this item. Then you go into Edit mode (by selecting 'Edit this page' from the 'Edit' menu). This page can be the 'Themes' page, but can also be inside one of the themes you created.
To start editing an item, just click on one of the empty buttons (except the navigationbuttons that are already there). When an empty button is clicked, you're confronted with the 'edit' window as shown at the top of this page
As we said before, pVoice expects that this new item is 'a normal item', which means it will represent a word or a phrase. Since this is what we want, we can start editing rightaway.
In the same way we selected an image for a new theme (see 'Adding a theme' above), we can now select an image for a normal item. The explanation about the display of the caption we gave in the previous paragraph, also applies to a 'normal item'.
From this point on however, things are different. We are now required to enter a 'Display text'. This is the text that will be used for two things: the caption, and the text as it will be displayed when this item is selected by the user (in the textentry field at the bottom of a pVoice page). You can enter a letter, a word or a whole prhase here.
The next field, 'phonetical text' is not required. However, sometimes your speechsynthesizer doesn't pronounce your display text the way you expect it. To hear what speechsynthesizer makes of your text, press the 'Test' button. This will make the speechsynthesizer pronounce your text. If it doesn't sound right, you can enter something different in the phonetical text field, so that it pronounces the text the way you want it to. Keep changing this phonetical text and testing untill it sounds right.
The final step in adding a new item, is deciding wether or not there should be a space character added to the text you added in the 'Display text' field. For a word or a phrase you'd normally want a space character to be added to the text. However, if the displaytext is only one letter, you might not want a space to be added, so that the user can form words with seperate letters. For this purpose the 'Add Space' checkbox is present on this window.
Adding a page
When you're in editmode, clicking on the navigationbuttons at the top allow you to browse through the pages of either the Theme index (when you are inside the Theme index) or through the pages of the current theme. When you're on the last page, and you go to the next page by clicking on the right arrow button, pVoice automatically adds an empty page for you. You can then add items or themes on this newly created page.
Editing an existing item or theme
If you want to edit an existing item or an existing theme, you simply navigate to the page where the symbol for this item or theme resides, go into editmode (see above), click on the symbol and modify the parameters in the window that pops up.
Removing an existing item or theme
To remove an existing item or theme, you again navigate to the page where this item or theme resides, go into editmode (see above), click on the symbol and in the edit window that appears, you select 'Remove'. After you confirm this decision, the item or theme is removed.
If this action concerned the removal of the theme, the theme itself isn't removed, but just the reference to it. The theme is still in the database, so you can still recreate it on another page (see 'adding a theme' above)